![]()
Creating the email Message
Predefining Message Components
Before you can create an email message, define the following information.
default message text
opt out message
unsubscribe message
“from” address
You can define as many as you want of each item. You must, however, define at least one opt-out message, unsubscribe message, and “from” address to use the Web Alert feature.
These message components are later inserted into an email message that is sent to your subscribers. See Also: Creating the email Message
Creating Default Message Text
You can create one or more default messages to contain the text of the email. A simple editor lets you apply some XHTML formatting the message.
Including Variables in the Default Message
The default message can include variables that retrieve information about the content and display it in the message text. The variables are surrounded by at signs (@). For example
The following content was recently updated: @AppContentLink@
In the email, this text might read:
The following content was recently updated: The Effect of Coumadin on Cardiac Patients
You can use the following variables in the body of a Web Alert message.
|
Variable |
Displays this information in the email |
|
@appContentTitle@ |
The title of the content block. |
|
@appCRLF@ |
A carriage return. Moves the text down one line. |
|
@appContentLink@ |
The link to the content block on the Web site. Note: You must be logged in to see the changes. |
|
@appContentURL@ |
The URL of the content, from the quicklink and domain. |
|
@appSubscriptionNames@ |
Comma separated list of subscriptions that a user selected. |
|
@appComment@ |
The comments for the content block. |
|
@appSubmitterFirstName@ |
The first name of the user who submitted the content block. |
|
@appSubmitterLastName@ |
The last name of the user who submitted the content block. |
To create default message text, follow these steps.
1. From the Ektron CMS400.NETWorkarea, choose Settings > Configuration > Web Alerts > Messages.
2. Click Add ( ).
).
3. Enter a title that describes the message.
4. At the Type field, select DefaultMessage.
5. In the editor, enter the message text.
6. Click Save ( ).
).
Creating Opt Out Message Text
An Opt-Out message appears as the first line of every email. It directs the reader to the Unsubscribe message at the bottom. Here is an example:
You have subscribed to receive alerts from the Ektron CMS400.NET email alert system. See below for removal instructions.
You can add variables to the Opt Out text. See Also: Including Variables in the Default Message
To create Opt Out message text, follow these steps.
1. Go to Settings > Configuration > Web Alerts > Messages.
2. Click Add ( ).
).
3. Enter a title that describes the Opt-Out message.
4. At the Type field, select OptOut.
5. In the editor, enter the message text.
6. Click Save ().
Creating Unsubscribe Message Text
An Unsubscribe message lets the person receiving the email remove himself from the subscription list.
You can add variables to the Unsubscribe text. See Also: Including Variables in the Default Message
To create Unsubscribe message text, follow these steps.
1. Go to Settings > Configuration > Web Alerts > Messages.
2. Click Add ().
3. Enter a title that describes the Unsubscribe message.
4. At the Type field, select Unsubscribe.
5. In the editor, enter the message text.
6. Click Save ().
Creating “From” Addresses
Any email generated by the Web Alert feature must have a “from” address. To create one or more “from” addresses, follow these steps.
1. Go to Settings > Configuration > Web Alerts > Email From List.
2. Click Add ().
3. Enter an email address that will be used in the From field of messages generated by the Web Alert feature.
4. Click Save ().
Combining Message Components to Create the Message
You create the content of an email message by configuring the following components. Some are required. Then, when content is published, Ektron CMS400.NET retrieves the field values to create the email Web Alert.
Note: If you reached this screen while creating an eCommerce message, see eCommerce Messages.
Note: To set or modify this information, you must have permission to edit the folder.
|
Component |
Comment |
Required? |
|
1. Subject line |
Plain text you enter on the Web Alerts tab of the Folder Properties screen |
No |
|
2. From address |
Yes |
|
|
3. Opt out message |
Yes |
|
|
4. Default message |
No |
|
|
5. Content Summary |
The Summary of the content item whose creation or change generates the email. Note: The Summary can include variables that retrieve information about the content item. See Including Variables in the Default Message |
No |
|
Identify CMS content to include within the email content. To identify an existing content item, click Select next to the Use Content checkbox. Then, navigate to the content item. Note: If the content item is an Office document or a managed file, a link to that item appears within the email message, not the item itself. To insert this content item (that is, the one whose creation or change triggers this Web Alert), click Use Current. To create a new content block to insert into this message, click Select next to the Use Content checkbox. When the folder navigation window appears, click Add Content ( |
No |
|
|
7. Unsubscribe message |
Yes |
The elements appear within the email in the sequence shown above.
Previewing the email Message
You can preview the email message at any time by clicking preview, which appears to the right of the Web Alert Contents: label on the Web Alerts tab (see below).
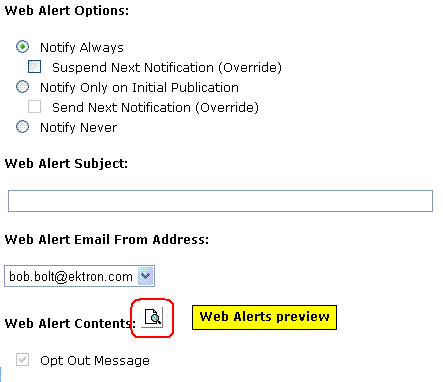
The button appears on the Web Alerts tab for folders as well as content.
When you click Preview, a new window displays the body of the email message. (The components used in an email message are listed in Combining Message Components to Create the Message.)
After previewing the message, you can change any message components and click the button again to review the updated message. You don’t need to save or check in the content to update the preview.


![]()